
Ninja Creami Vanilla Gelato is a rich, creamy, and indulgent dessert that brings the authentic taste of Italian gelato right to your kitchen. With the Ninja Creami, achieving the perfect gelato texture is effortless—it allows you to customize the creaminess, sweetness, and mix-ins to create a dessert that rivals any gelato shop. Unlike traditional ice cream makers, the Ninja Creami processes frozen mixtures into smooth, velvety gelato with just the press of a button.
Disclosure: This post may contain affiliate links. As an Amazon Associate, I earn from qualifying purchases. Read more.

Ninja Creami Vanilla Gelato Recipe
Ingredients for Ninja Creami Vanilla Gelato
To create a rich and creamy vanilla gelato with the Ninja Creami, you’ll need the following ingredients:
Dairy Base for Creamy Texture
- 1 cup (240 ml) whole milk – Provides the right balance of fat and liquid for a smooth, creamy gelato. Whole milk is essential to achieve the traditional gelato consistency.
- 1 cup (240 ml) heavy cream – Adds richness and enhances the smooth texture of the gelato. The high fat content helps create a luscious mouthfeel.
Sweeteners for Balanced Flavor
- ½ cup (100 g) granulated sugar – Sweetens the gelato while also contributing to its soft and scoopable texture.
- 1 tablespoon (15 ml) light corn syrup (optional) – Helps prevent ice crystals from forming and results in a silkier gelato. If you prefer a more natural option, you can substitute with honey or maple syrup.
Flavor Enhancer
- 1 tablespoon (15 ml) pure vanilla extract – Infuses the gelato with deep vanilla flavor. For a more intense, gourmet taste, you can use the seeds from 1 vanilla bean instead.
Egg Yolks for Traditional Gelato Texture
- 2 large egg yolks – Give the gelato a rich, custard-like consistency. They also help emulsify the mixture, making it smoother and more stable.
Optional Add-ins
- Pinch of salt – Enhances the flavors and balances the sweetness.
- Mix-ins (chocolate chips, cookie crumbles, caramel swirls, etc.) – Can be added during the re-spin process in the Ninja Creami for extra texture and flavor.
Instructions for Making Ninja Creami Vanilla Gelato
Follow these step-by-step instructions to create a smooth and creamy vanilla gelato using the Ninja Creami.
Step 1: Heat the Base
- In a medium saucepan, combine 1 cup whole milk, 1 cup heavy cream, and ½ cup granulated sugar over medium heat.
- Stir constantly with a whisk or spatula until the sugar is fully dissolved. Do not let the mixture boil—heat it just until it’s warm and steam begins to rise.
- If using light corn syrup (1 tablespoon, optional), add it now and whisk until fully incorporated.
Step 2: Temper the Egg Yolks
- In a separate small bowl, whisk 2 large egg yolks until they become slightly pale.
- Slowly ladle a small amount (about ¼ cup) of the warm milk mixture into the egg yolks while whisking continuously.
- Gradually add another ladle (¼ cup) of the warm mixture while whisking—this helps temper the eggs so they don’t scramble when added to the hot liquid.
Step 3: Cook Until Thickened
- Pour the tempered egg yolk mixture back into the saucepan with the remaining warm milk and cream.
- Reduce the heat to low and cook while stirring constantly with a spatula. The mixture should thicken slightly and coat the back of a spoon (about 5-7 minutes).
- Do not let it boil—if the mixture starts to bubble, remove it from heat immediately.
- Once thickened, remove from heat and stir in 1 tablespoon pure vanilla extract (or vanilla bean seeds for a stronger flavor).
Step 4: Chill the Mixture
- Pour the cooked gelato base into a heatproof bowl and let it cool to room temperature.
- Cover the bowl with plastic wrap, pressing it directly against the surface of the mixture to prevent a skin from forming.
- Refrigerate for at least 4 hours, or preferably overnight, to allow flavors to develop and ensure a smooth texture.
Step 5: Freeze the Mixture
- After chilling, pour the mixture into the Ninja Creami pint container.
- Secure the lid and place it in the freezer on a level surface.
- Freeze for at least 24 hours, until the mixture is completely solid.
Step 6: Process in the Ninja Creami
- Remove the frozen pint from the freezer and remove the lid.
- Place the pint into the Ninja Creami outer bowl, securing it with the paddle.
- Lock the outer bowl into the machine and select the “Gelato” function.
- Once the cycle completes, check the texture. If the gelato appears crumbly, select the “Re-spin” function to achieve a creamier consistency.
- If desired, add mix-ins (chocolate chips, cookie crumbles, caramel swirls) and select the “Mix-in” function to evenly distribute them.
Step 7: Serve & Enjoy
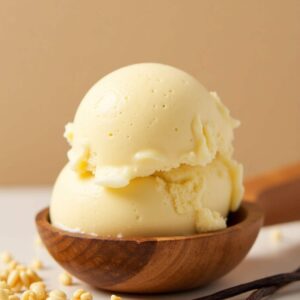
- Scoop the freshly spun vanilla gelato into bowls or cones.
- Top with fresh fruit, chocolate shavings, or a drizzle of caramel for extra indulgence.
- If storing leftovers, place the gelato in an airtight container and keep it in the freezer. Allow it to sit at room temperature for 5-10 minutes before serving for the best texture.
Ninja Creami Vanilla Gelato Recipe
Equipment
- Ninja Creami Machine – Essential for processing and achieving a smooth, creamy gelato texture.
- Ninja Creami Pint Container – Used to freeze the gelato base before processing.
- Medium Saucepan – For heating the milk, cream, and sugar mixture.
- Whisk – Helps dissolve sugar and combine ingredients smoothly.
- Small Mixing Bowl – For whisking and tempering egg yolks.
- Spatula – Useful for stirring and checking the consistency of the mixture while cooking.
- Measuring Cups & Spoons – Ensures accurate ingredient measurements.
- Fine Mesh Strainer (optional) – Can be used to strain the mixture for an ultra-smooth gelato base.
- Plastic Wrap – Helps prevent a skin from forming on the gelato base while chilling.
- Airtight Container (optional) – For storing leftovers and maintaining freshness.
Ingredients
- 1 cup (240ml) whole milk
- ¾ cup (180ml) heavy cream
- ⅓ cup (65g) granulated sugar
- 2 large egg yolks
- 1 tablespoon (15ml) pure vanilla extract (or 1 vanilla bean, scraped)
- Pinch of salt (optional, to enhance flavor)
Instructions
- Heat the BaseIn a medium saucepan, combine whole milk, heavy cream, and sugar over medium heat. Stir until the sugar is fully dissolved and the mixture is warm but not boiling.
- Temper the Egg YolksIn a small bowl, whisk the egg yolks. Slowly add about ½ cup of the warm milk mixture, whisking constantly to prevent curdling. Then, gradually pour the tempered yolks back into the saucepan, stirring continuously.
- Thicken the MixtureCook the mixture over low heat, stirring constantly, until it thickens slightly (about 5 minutes). Do not let it boil. Remove from heat and stir in the vanilla extract (or scraped vanilla bean seeds) and a pinch of salt (if using).
- Chill and FreezePour the mixture through a fine mesh strainer (optional) for an ultra-smooth texture. Cover and refrigerate for at least 4 hours (preferably overnight). Once chilled, pour into the Ninja Creami pint container, secure the lid, and freeze for 24 hours.
- Process in Ninja CreamiPlace the frozen pint in the Ninja Creami machine and select the Gelato function. If the texture appears crumbly, use the Re-spin function or add 1-2 tablespoons of milk or cream before re-spinning. Serve immediately and enjoy!
Notes
- Use Full-Fat Dairy for Creaminess – Whole milk and heavy cream are essential for achieving the signature gelato texture. Skim or low-fat milk may result in an icier consistency.
- Properly Temper the Egg Yolks – When adding warm milk to the egg yolks, do it slowly while whisking constantly to prevent curdling.
- Chill Before Freezing – The mixture must be fully chilled for at least 4 hours (preferably overnight) before placing it in the freezer to develop better flavor and texture.
- Re-Spin if Needed – If the gelato appears crumbly after the first spin in the Ninja Creami, use the Re-spin function for a smoother consistency. Adding 1-2 tablespoons of milk or cream can also help.
- Customize with Mix-Ins – After processing, you can add chocolate chips, cookie crumbles, or caramel swirls using the Ninja Creami’s Mix-In function.
- Storage Tips – Store any leftovers in an airtight container and press a layer of plastic wrap directly on the surface to prevent ice crystals. Let it sit at room temperature for 5-10 minutes before serving for the best texture.
Tips for Making the Best Ninja Creami Vanilla Gelato
1. Use High-Quality Ingredients
- Opt for whole milk and heavy cream for the creamiest texture. Avoid low-fat alternatives, as they may result in an icy consistency.
- Use pure vanilla extract or a vanilla bean for an authentic, rich flavor. If using a vanilla bean, scrape the seeds into the mixture and let the pod steep in the warm milk for extra depth.
2. Chill the Mixture Properly
- Ensure the gelato base is fully chilled (at least 4 hours, preferably overnight) before freezing. This helps develop the best flavor and texture.
- Press a piece of plastic wrap directly onto the surface of the mixture before refrigerating to prevent a skin from forming.
3. Freeze the Mixture on a Level Surface
- When placing the pint container in the freezer, make sure it’s on a flat, level surface to ensure even freezing.
4. Re-Spin for the Creamiest Texture
- If the gelato looks crumbly after the first spin, use the “Re-spin” function to smooth it out. This is common and helps achieve the perfect creamy consistency.
- If needed, add 1-2 tablespoons of milk or cream before re-spinning to improve texture.
5. Customize Your Gelato
- For a lighter texture, substitute half-and-half for heavy cream.
- Add a pinch of salt to enhance flavor and balance sweetness.
- Mix in chocolate chips, crushed cookies, or caramel swirls after the first spin using the “Mix-in” function.
6. Let the Gelato Soften Before Serving
- If storing leftovers, allow the gelato to sit at room temperature for 5-10 minutes before scooping for the best texture.
7. Prevent Ice Crystals
- To keep the gelato smooth, store it in an airtight container and place a layer of plastic wrap directly on the surface before sealing with the lid.
Conclusion
Making Ninja Creami Vanilla Gelato at home is a simple yet rewarding experience that allows you to enjoy a rich, creamy, and authentic Italian-style dessert with minimal effort. With its lower air content and smooth, dense texture, gelato offers a luxurious alternative to traditional ice cream. By using high-quality ingredients, properly chilling the base, and utilizing the Re-spin function when needed, you can achieve a perfectly creamy and flavorful vanilla gelato every time. Whether enjoyed on its own or paired with toppings like fresh berries, chocolate shavings, or caramel drizzle, this homemade treat is sure to impress.
The Ninja Creami makes it easy to customize your gelato to suit your taste preferences, from adjusting sweetness to adding mix-ins like cookie crumbles or nuts. With just a few simple steps—heating the base, freezing, and processing—you can create a delicious dessert that rivals any gelato shop. So, grab your Ninja Creami, experiment with flavors, and indulge in the creamy goodness of homemade vanilla gelato!

Hi, I’m Katelyn Williams, the expert behind Ninjacreamiicecream.com. With a deep passion for creating delectable ice cream recipes, I’m here to share my love for all things ice cream. I earned my Bachelor’s degree from Louisiana State University, and since then, I’ve been dedicated to perfecting the art of ice cream making. From classic flavors to innovative creations, my goal is to inspire you to make delicious and creamy treats at home effortlessly. Join me for the best recipes, tips, and techniques to elevate your ice cream game and indulge in delightful frozen desserts!
Amazinggg!!!
I just got my ninja creami and it was the first-ish recipe I tried!
First time I came up with my own on-the-spot recipe and although the texture was great (I used the regular ice-cream function), the flavour wasn’t too good. I’ve tried this one and honestly it’s 10 times better tham store bought!! The gelato texture came out perfect and the flavour is amazing!! I added the optionals add ins and even added more vanilla extract than what it says in the recipe and I couldn’t be more content. Thank you!
Thank You Mika, I am glad that you liked it.